


Understanding Custom Steel Gates What Are Custom Steel Gates? Custom steel gates are tailored-made barriers crafted primarily from steel, designed to provide security, aesthetics, and functionality. U
Understanding Vapor Barrier Installation
Vapor barriers play a crucial role in safeguarding the structural integrity of homes, especially beneath them in crawl spaces. The installation of a vapor barrier is a proactive approach to controlling moisture and ensuring that indoor spaces remain dry and healthy. Especially in areas prone to dampness, understanding Vapor Barrier Installation becomes essential for homeowners and builders alike.
What is a Vapor Barrier?
A vapor barrier is a material designed to resist the passage of moisture through walls, floors, and ceilings. Typically made from polyethylene plastic, it acts as a shield, preventing moisture from the ground or outside atmosphere from penetrating into the home. This is particularly vital in crawl spaces, where dampness can lead to several issues including mold growth, wood rot, and structural damage.
Importance of Vapor Barrier Installation
The importance of installing a vapor barrier cannot be overstated. By effectively controlling humidity levels in crawl spaces, it protects the foundation and the overall structure of your home. Moisture can lead to many problems, from compromised insulation to the development of pests like termites and rodents. Furthermore, a well-installed vapor barrier can enhance indoor air quality, making your home healthier and more comfortable.
Common Materials Used in Vapor Barriers
The materials used for vapor barriers can vary, but some of the most common include:
- Polyethylene Film: This is the most frequently used material for vapor barriers. It comes in different thicknesses and provides excellent moisture resistance.
- Foil Barrier: Made of reflective aluminum, foil barriers are great for reflecting heat and controlling moisture, often used in conjunction with insulation.
- Spray Foam: An alternative to traditional barriers, spray foam can seal gaps and holes, providing an effective moisture barrier while also insulating.
Preparing Your Crawl Space for Vapor Barrier Installation
Before diving into the installation process, it’s essential to properly prepare the crawl space. This step will ensure that the vapor barrier is installed efficiently and effectively, leading to long-term benefits.
Assessing the Crawl Space Environment
Start by assessing the crawl space environment. Look for signs of moisture, check for any existing water puddles or mold, and evaluate the overall condition of the space. A comprehensive assessment will help determine if additional moisture control methods, such as installing a sump pump or improving drainage, are necessary.
Clearing Debris and Moisture Control
Once the assessment is complete, clear the crawl space of any debris, including outdated insulation, trash, or building materials that could trap moisture. It’s also important to control any existing moisture – consider using a dehumidifier to maintain optimal humidity levels before and after the vapor barrier installation.
Tools and Materials Needed for Installation
Gathering the right tools and materials is vital for a successful installation. You will need:
- Vapor barrier material (typically polyethylene)
- Utility knife for cutting the barrier
- Tape measure to ensure proper sizing
- Stapler or adhesive for securing the barrier
- Sealing tape for overlapping seams
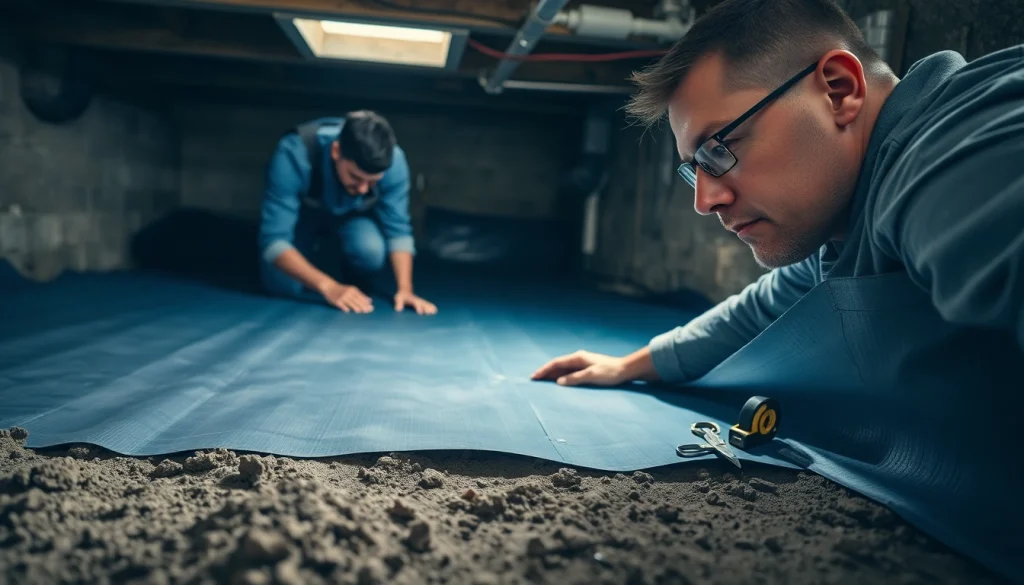
Step-by-Step Process of Vapor Barrier Installation
Now that the preparation is complete, follow this comprehensive step-by-step guide for installing a vapor barrier effectively.
Laying the Barrier Properly
Begin by laying the vapor barrier flat on the ground, ensuring it extends up the walls of the crawl space. Overlap seams by at least 12 inches to prevent moisture from seeping through and secure them with sealing tape. Use a utility knife to cut the barrier to size as needed, maintaining a clean and straight edge.
Sealing and Insulating Techniques
After laying the barrier, it’s essential to seal it properly. Use high-quality sealing tape to secure the seams and edges. In addition, consider insulating the walls of the crawl space. Insulation works in conjunction with the vapor barrier to maintain temperature control and enhance energy efficiency.
Common Mistakes to Avoid during Installation
While installing a vapor barrier, homeowners often make several common mistakes, including:
- Not overlapping seams adequately.
- Failing to seal edges and overlaps properly.
- Ignoring moisture issues prior to installation.
Avoiding these pitfalls will enhance the barrier’s overall effectiveness and longevity.
Maintenance and Inspection post-Vapor Barrier Installation
Once the vapor barrier is installed, ongoing maintenance and regular inspections will help ensure it remains effective over time.
Regular Checks for Effectiveness
Schedule inspections every six months to evaluate the condition of the vapor barrier. Look for signs of wear, moisture accumulation, or any physical damage to the material. Keeping a close eye on these factors will help you catch potential issues early.
Signs Your Vapor Barrier Needs Attention
Be aware of signs that indicate the vapor barrier may need repair or replacement. These include:
- Mold or mildew growth in the crawl space.
- Moisture or puddles on the barrier’s surface.
- Peeling or damaged edges.
Tips for Maintaining Indoor Air Quality
To maintain indoor air quality, consider implementing additional ventilation systems such as exhaust fans or air purifiers. Keeping humidity levels in check also plays a pivotal role in preventing moisture-related issues, contributing to a healthier living environment overall.
FAQs about Vapor Barrier Installation
What types of vapor barriers are available?
Vapor barriers come in various types, including polyethylene films, foil barriers, and spray foam, each offering distinct moisture resistance properties.
How effective is a vapor barrier against moisture?
A properly installed vapor barrier can significantly reduce moisture infiltration, preventing mold and structural damage over time.
Can I install a vapor barrier myself?
Yes, with the right tools and guidance, homeowners can install a vapor barrier themselves, although professional assistance is recommended for complicated cases.
How long does a vapor barrier last?
On average, a quality vapor barrier can last between 10 to 20 years, depending on environmental factors and installation quality.
Do I need a permit for vapor barrier installation?
Typically, a permit is not required for vapor barrier installation, but local building codes should always be checked to ensure compliance.

